
BBQ Grill Cookies (Father’s Day Cookies)
20 cookies
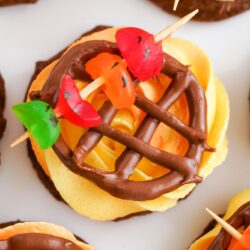
These fun chocolate Father's Day Cookies are all dressed up to look like a BBQ grill with gummy candy and an easy to make chocolate grill grate!
Equipment
Ingredients
For the cookies
- 1 cup flour
- ¼ cup cocoa powder
- 1 stick (½ cup) unsalted butter softened to room temperature
- ½ cup granulated sugar
- 1 large egg at room temperature
- 1 teaspoon vanilla extract
- ½ cup milk chocolate chips melted
For the Buttercream Frosting:
- 1 sticks (1 cup) unsalted butter softened to room temperature
- 3 cups powdered sugar
- 2 teaspoons vanilla extract
- ¼ teaspoon salt
- Yellow gel food coloring
- Orange gel food coloring
To decorate:
- ¼ cup milk chocolate chips
- DOTS candies
- Gummy bears
- Black edible marker
- Toothpicks
Instructions
To make the cookies:
- Preheat the oven to 350°F/180°C (160°C for a fan oven), and line a baking sheet with parchment paper or a Silpat silicone baking mat. Set aside.
- In a medium bowl, combine flour with cocoa powder. Set aside.
- In a separate mixing bowl, with a hand mixer, cream the butter and sugar until light and fluffy. Add egg and vanilla extract, and beat again.
- Add melted chocolate, and beat again until just combined, then add the dry ingredients and beat on low speed until just combined.
- Use a medium cookie scoop to drop the dough onto the lined baking sheet, leaving two inches between each cookie. Bake for 10 minutes, or until the cookies are set and the tops are no longer shiny/glossy.
- Allow the cookies to cool on the pan for 2 minutes, then transfer to a wire rack to cool completely.
For the Frosting
- In a large bowl with a hand mixer, or in the bowl of your stand mixer, beat the butter at medium speed for 1 minute, or until creamy.
- Decrease the speed to low, and gradually add in the powdered sugar, vanilla extract, and salt. Continue beating for 3 minutes until light and fluffy.
- If needed, add a small amount of milk to the frosting to get it to the perfect piping consistency.
- Divide the frosting in half into two separate bowls. Use food coloring to tint one bowl yellow, and the other with orange color.
- To combine the frostings, lay out two pieces of plastic wrap. Add the frosting to the wrap, and then roll it up into a tube shape, twisting the ends to seal. Snip off one of the twisted ends from each tube.
- Add a star tip to a large piping bag, then add both colors of frosting, with the open end of the rolls pointing down toward the tip.
- Add a swirl of buttercream to each cookie.
To Decorate:
- Carefully melt the chocolate chips in the microwave at 15-second increments mixing in between. Add coconut oil if needed to thin out the consistency.
- Line a cookie sheet with parchment paper.
- Add the melted chocolate to a piping bag, snip off a small piece of the corner to pipe a line that is not too thin or too thick to create the grill grids.Then create grill shapes/grids with the melted chocolate about 2 inches wide (or the size of your cookies). Allow to set and harden in the fridge completely before peeling off the parchment.
- To make the gummy kabobs, use toothpicks as skewers and add 3-4 gummy bears and dots (that are cut in half) on each. You can use a black edible marker to create charred kabobs.
- To assemble, add one chocolate grill to each frosted cookie, then top with one gummy kabob.
Notes
- Instead of melted chocolate in the cookie dough, use Nutella instead for a bit of hazelnut flavor.
- Let people know about the toothpicks. The only inedible part of these cookies is the wooden toothpicks. They should be removed before taking a big bite! If you'd rather not use the toothpicks, these cookies are still super cute with the "food" just sitting on the grill instead.
- If the melted chocolate is too thick, stir in a small amount of coconut oil so that it pipes more easily.
- Draw a pattern for the grid on paper with a marker, then place that paper underneath your parchment. Use it as a guide!
- Use the refrigerator to quickly harden the chocolate grill grates.
- Gel food coloring will give you the brightest and most vibrant colors.
- These BBQ grill cookie decorations can be used with any type of cookie. If you'd rather not make these easy chocolate cookies, try this with my Ultimate Sugar Cookie Recipe, cut into circles.
- Store decorated cookies in an airtight container in the fridge for up to 3 days. I suggest adding the gummy kabobs just before serving to keep them soft.
- Undecorated cookies can be stored in the freezer for up to 3 months.
Nutrition
Serving: 1cookie | Calories: 286kcal | Carbohydrates: 34g | Protein: 1g | Fat: 17g | Saturated Fat: 11g | Polyunsaturated Fat: 1g | Monounsaturated Fat: 4g | Trans Fat: 1g | Cholesterol: 46mg | Sodium: 35mg | Potassium: 57mg | Fiber: 1g | Sugar: 28g | Vitamin A: 439IU | Calcium: 14mg | Iron: 1mg